
主要介绍如何安装nginx和https所需的免费证书。
🎁安装nginx
安装nginx
1
2
sudo apt-get update
sudo apt-get install git nginx -y新建网站文件夹
1
2
3
sudo mkdir -p /var/www/hexo
sudo chown -R $USER:$USER /var/www/hexo
sudo chmod -R 755 /var/www/hexo配置nginx
1
sudo vim /etc/nginx/sites-available/default
修改为以下内容:
1
2
3
4
5
6
7
8
9
10
11
12
13
14
server {
listen 80 default_server;
listen [::]:80 default_server;
root /var/www/hexo;
index index.html index.htm;
server_name _;
location / {
# First attempt to serve request as file, then
# as directory, then fall back to displaying a 404.
try_files $uri $uri/ =404;
}
}启停nginx
1
sudo service nginx restart
🎉安装免费证书SSL
Let’s Encrypt 是一家免费、开放、自动化的证书颁发机构(CA),为公众的利益而运行。它是一项由 Internet Security Research Group(ISRG)提供的服务。其以尽可能对用户友好的方式免费提供为网站启用 HTTPS(SSL/TLS)所需的数字证书来创建一个更安全,更尊重隐私的 Web 环境。
Let’s Encrypt的关键原则为:
- 免费:任何拥有域名的人都可以使用 Let’s Encrypt 免费获取受信的证书。
- 自动化:运行于服务器上的软件可以与 Let’s Encrypt 直接交互,以便轻松获取证书,安全地配置它,并自动进行续期。
- 安全: 无论是作为一个证书颁发机构(CA)还是通过帮助网站运营商正确地保护其服务器。
- 透明:所有颁发或吊销的证书将被公开记录,供任何人查阅。
- 开放:自动颁发、续期证书的协议将作为其他人可以使用的开放标准发布。
- 乐于合作:Let’s Encrypt 是为了让整个互联网社区受益而做出的共同努力,它不受任何单一组织的控制。
安装Certbot
1
2
wget https://dl.eff.org/certbot-auto
chmod a+x ./certbot-auto生成证书
1
./certbot-auto --server https://acme-v02.api.letsencrypt.org/directory -d "xxxxxx.com" -d "*.cxxxxxx.com" --manual --preferred-challenges dns-01 certonly
根据打印的信息添加两条TXT解析记录y
1
2
3
4
5
6
7
8
9
10
11
12
13
14
15
16
17
18
19
20
21
22
23
24
25
26
27
28
29
30
31
32
33
34
35
36
37
38
39
40
41
42
43
44
45
46
47
48
49
50
51
52
53
54
55
56
57root@localhost:~# ./certbot-auto --server https://acme-v02.api.letsencrypt.org/directory -d "yaronzz.com" -d "*.yaronzz.com" --manual --preferred-challenges dns-01 certonly
Saving debug log to /var/log/letsencrypt/letsencrypt.log
Plugins selected: Authenticator manual, Installer None
Obtaining a new certificate
Performing the following challenges:
dns-01 challenge for yaronzz.com
dns-01 challenge for yaronzz.com
- - - - - - - - - - - - - - - - - - - - - - - - - - - - - - - - - - - - - - - -
NOTE: The IP of this machine will be publicly logged as having requested this
certificate. If you're running certbot in manual mode on a machine that is not
your server, please ensure you're okay with that.
Are you OK with your IP being logged?
- - - - - - - - - - - - - - - - - - - - - - - - - - - - - - - - - - - - - - - -
(Y)es/(N)o: y #选择y
- - - - - - - - - - - - - - - - - - - - - - - - - - - - - - - - - - - - - - - -
Please deploy a DNS TXT record under the name
_acme-challenge.yaronzz.com with the following value:
#将第一条主机记录_acme-challenge和下面的记录值添加的解析
fXseZpKheNVwMxxxxxxxxxxxxxxxxxxxxxxxxxxx
Before continuing, verify the record is deployed.
- - - - - - - - - - - - - - - - - - - - - - - - - - - - - - - - - - - - - - - -
Press Enter to Continue
- - - - - - - - - - - - - - - - - - - - - - - - - - - - - - - - - - - - - - - -
Please deploy a DNS TXT record under the name
_acme-challenge.yaronzz.com with the following value:
#将第二条主机记录_acme-challenge和下面的记录值添加的解析
xOuUgL4jxxxxxxxxxxxxxxxxxxxxxxxxxxxxxxxx
Before continuing, verify the record is deployed.
(This must be set up in addition to the previous challenges; do not remove,
replace, or undo the previous challenge tasks yet. Note that you might be
asked to create multiple distinct TXT records with the same name. This is
permitted by DNS standards.)
- - - - - - - - - - - - - - - - - - - - - - - - - - - - - - - - - - - - - - - -
Press Enter to Continue
Waiting for verification...
Cleaning up challenges
IMPORTANT NOTES:
- Congratulations! Your certificate and chain have been saved at:
/etc/letsencrypt/live/yaronzz.com/fullchain.pem
Your key file has been saved at:
/etc/letsencrypt/live/yaronzz.com/privkey.pem
Your cert will expire on 2020-11-14. To obtain a new or tweaked
version of this certificate in the future, simply run certbot-auto
again. To non-interactively renew *all* of your certificates, run
"certbot-auto renew"
- If you like Certbot, please consider supporting our work by:
Donating to ISRG / Let's Encrypt: https://letsencrypt.org/donate
Donating to EFF: https://eff.org/donate-le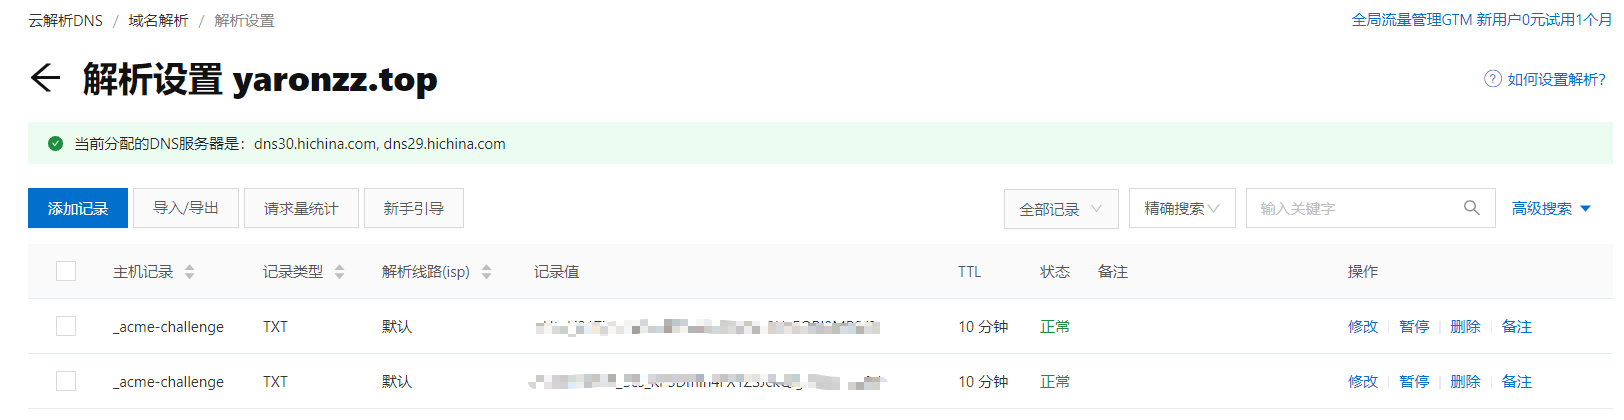
查看生成的证书
1
ls /etc/letsencrypt/live/xxxxxx.com
续签证书
1
2
3
4
./certbot-auto renew
# 如果提示未到期,cert not due for renewal,可以强制更新如下
./certbot-auto renew --force-renew
# 看到success表示成功了nginx添加证书
1
sudo vim /etc/nginx/sites-available/default
修改为以下内容:
1
2
3
4
5
6
7
8
9
10
11
12
13
14
15
16
17
18
19
20
21
22
23
24
25
26
27
28
server {
listen 80 default_server;
listen [::]:80 default_server;
listen 443 ssl default_server;
server_name xxxxxx.com;
ssl_certificate /etc/letsencrypt/live/xxxxxx.com/fullchain.pem;
ssl_certificate_key /etc/letsencrypt/live/xxxxxx.com/privkey.pem;
ssl_protocols TLSv1 TLSv1.1 TLSv1.2;
ssl_ciphers ECDHE-RSA-AES128-GCM-SHA256:HIGH:!aNULL:!MD5:!RC4:!DHE;
ssl_prefer_server_ciphers on;
ssl_session_cache shared:SSL:10m;
ssl_session_timeout 10m;
root /var/www/hexo;
index index.html index.htm;
server_name _;
location / {
# First attempt to serve request as file, then
# as directory, then fall back to displaying a 404.
try_files $uri $uri/ =404;
}
}